Every email service provider almost offers a email service without charging any cost and it is very much useful and a very fast way of communicating with the people around the world. The most important information like the documents and messages can be sent through the emails with free of cost as well. But some users use this mailing facility for a illegal purposes like spaming the unknown persons or the organizations etc.
Now if the Gmail want to keep a data of the IP Address of email sender in Gmail and here is tutorial for you to guide on how to do it. Gmail is the most popular emails service provider which has millions of users and in case if the sender happens to use a third party email clients like the available thunderbird or the GMAIL app then the IP address can be known very easily.
Find the IP address of Email Sender in Gmail
Step 1: Login to Gmail Account with the user credentials
Step 2: Open the email from Gmail account for which you wish to find the IP address for.
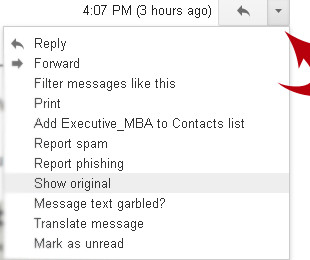
Step 3: Now just click on the inverted image which is present on the screen
Step 4: click on show original in the drop down list available
Step 5: Next see some image below which is visible on the screen.
Step 6: Now, press CTRL + F on your keyboard to open up search bar
Step 7: Search for Received: from- type this in the search bar
Step 8: Now you’ll see Received: from is which is visible on a highlighted font and in the line you find the IP address of sender .
Now you have the IP address of the sender who is sending the Email using Gmail. If your requirement is
That’ it! Now you have the IP address of the Email sender in Gmail. Depending upon your requirement you can use this IP address to track the location of the sender using IP address tracking tools.
Pro Tip about Gmail:
- Ctrl can be used to Compose email in a New Tab.
- Any email can be deletedby Right clicking on it and then selecting the delete option.
- Any email can be added to Archive by Right clicking on it and then select Archive
- Always sign out before you want to shut down your system or leave your computer to keep your account safe


Awesome! Rajesh bro..
Useful for me.
Thanks for your compliment bro 🙂
This is awesome article. You described it very smoothly and easy to understand. Thanks Bro for this tutorial.
welcome bro 🙂
Thanks for this awesome content .. I also like theme of your site
great post for knowing who send the mail and from where…It will helps for intelligence departments TOO
This does not work,
Show Original in Gmail does not show “received from” at all
you should search for “Received: from” and not as “received from”.
Awesome! Rajesh bro..
Useful for me.
Nice to know it helped you 🙂 get me a beer, Haha 😀